
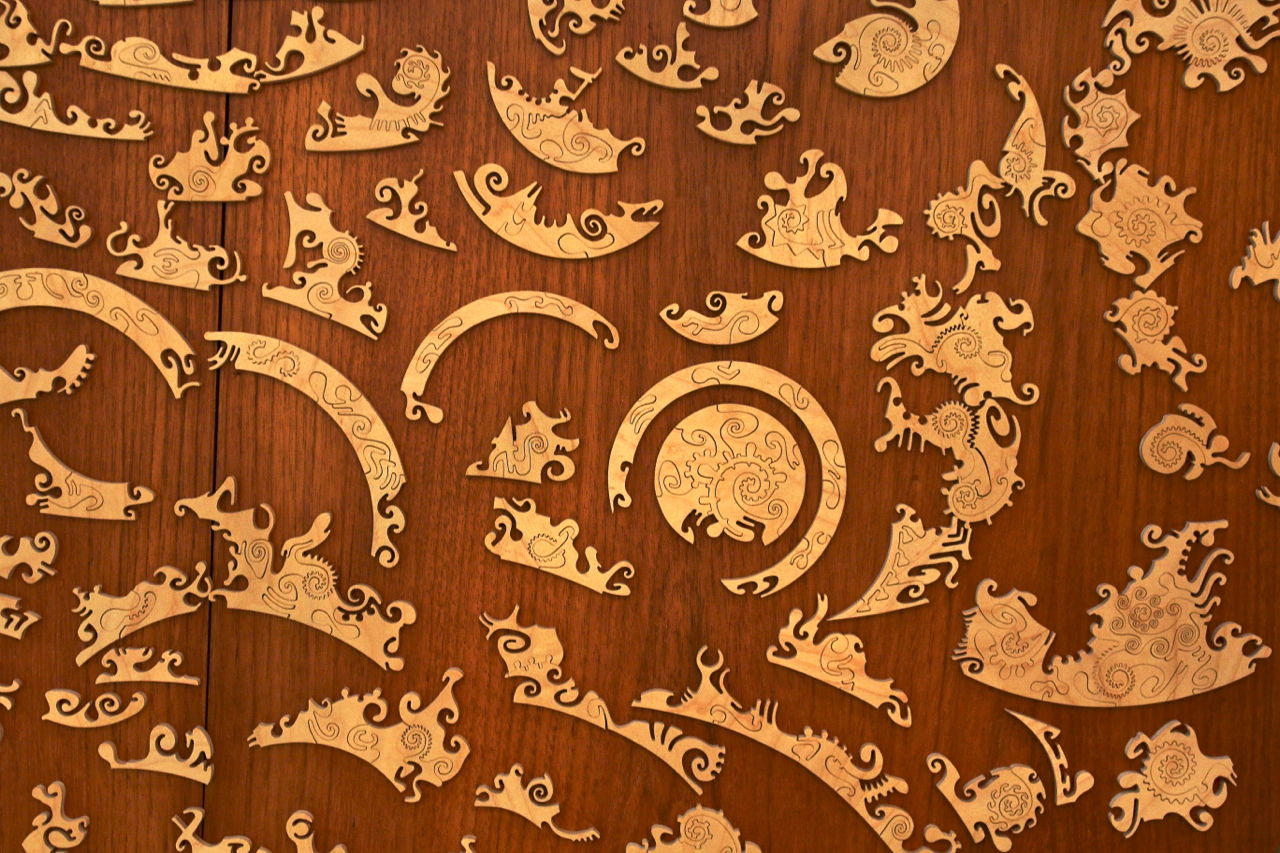
Puzzle 790 - Heron

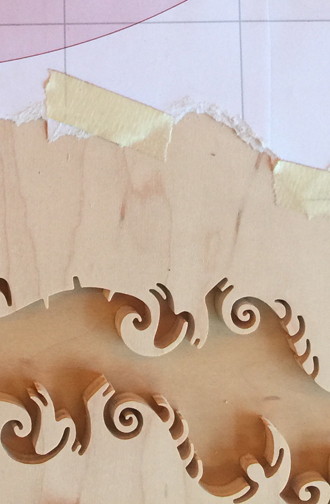
Puzzle #839 - Mini - Magnificent FlowScape Pattern
|
Custom Puzzle Craft Maker of Fine Wooden Jigsaw Puzzles |
|
July 18, 2025
Friday 2:58 PM - The eBay auction for Puzzle #593 - Beads, Beads and Beads! is underway. The 41st puzzle of the 100 Puzzles Project. See Auction. The auction ends on July 27 at 5:00 PM Pacific time.
June 9, 2025
Monday 7:40 AM - The eBay auction for Puzzle #839 - Mini - Magnificent FlowScape Pattern is underway. See Auction. The auction ends on June 11 at 5:43 PM Pacific time.
May 14, 2025
Wednesday 7:02 PM - The auction went extremely well, thank you for bidding! The prior owner of the puzzle has contacted me to auction on eBay the sale of two other puzzles I made for her, on a commission basis. One is a custom puzzle, Puzzle #790 Heron, all Long Round with 455 pieces, 10 3/4" by 13 5/16", cutting completed April 4, 2008. The second is a mini Geometric Pattern Puzzle, Puzzle 839 Mini - Magnificent FlowScape Pattern, 7 5/8" by 7 5/8" with 182 pieces, also cut in Long Round, cutting completed August 6, 2010. It may be a few months before they show up on eBay as I will have to assemble the puzzles to check their condition and completeness, and do all the other things to prepare for their sale - when I have time.
Puzzle 790 - Heron
Puzzle #839 - Mini - Magnificent FlowScape Pattern
May 1, 2025
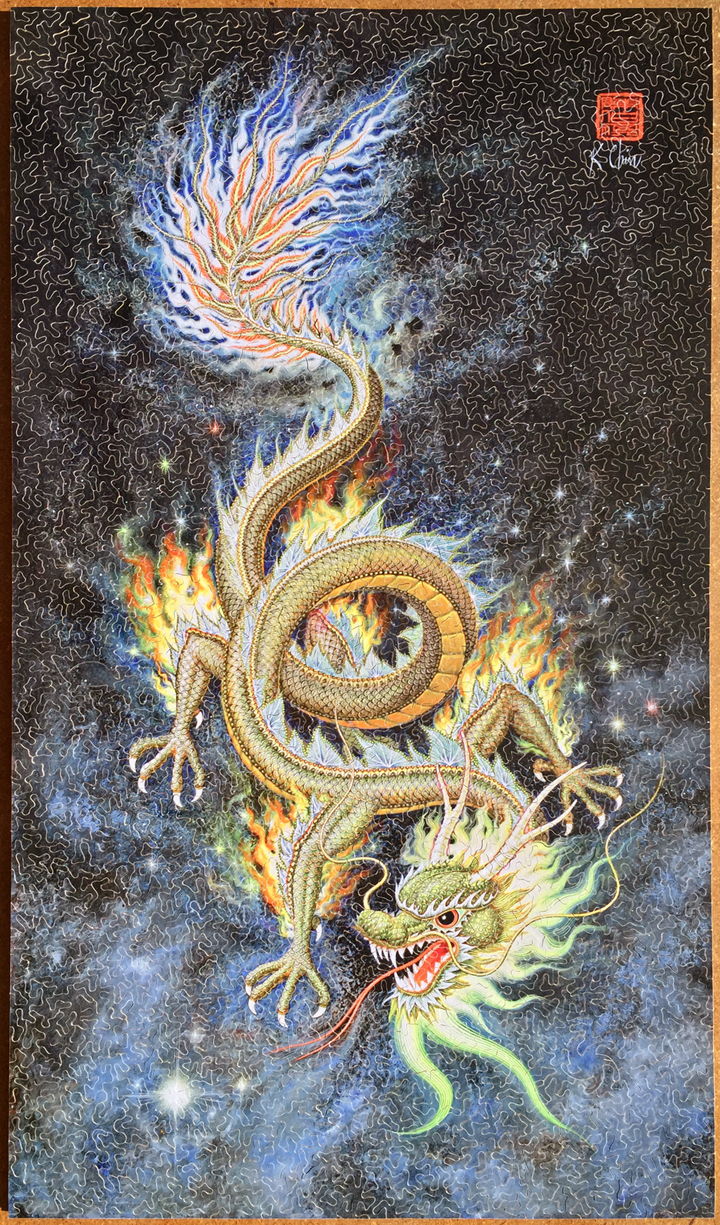
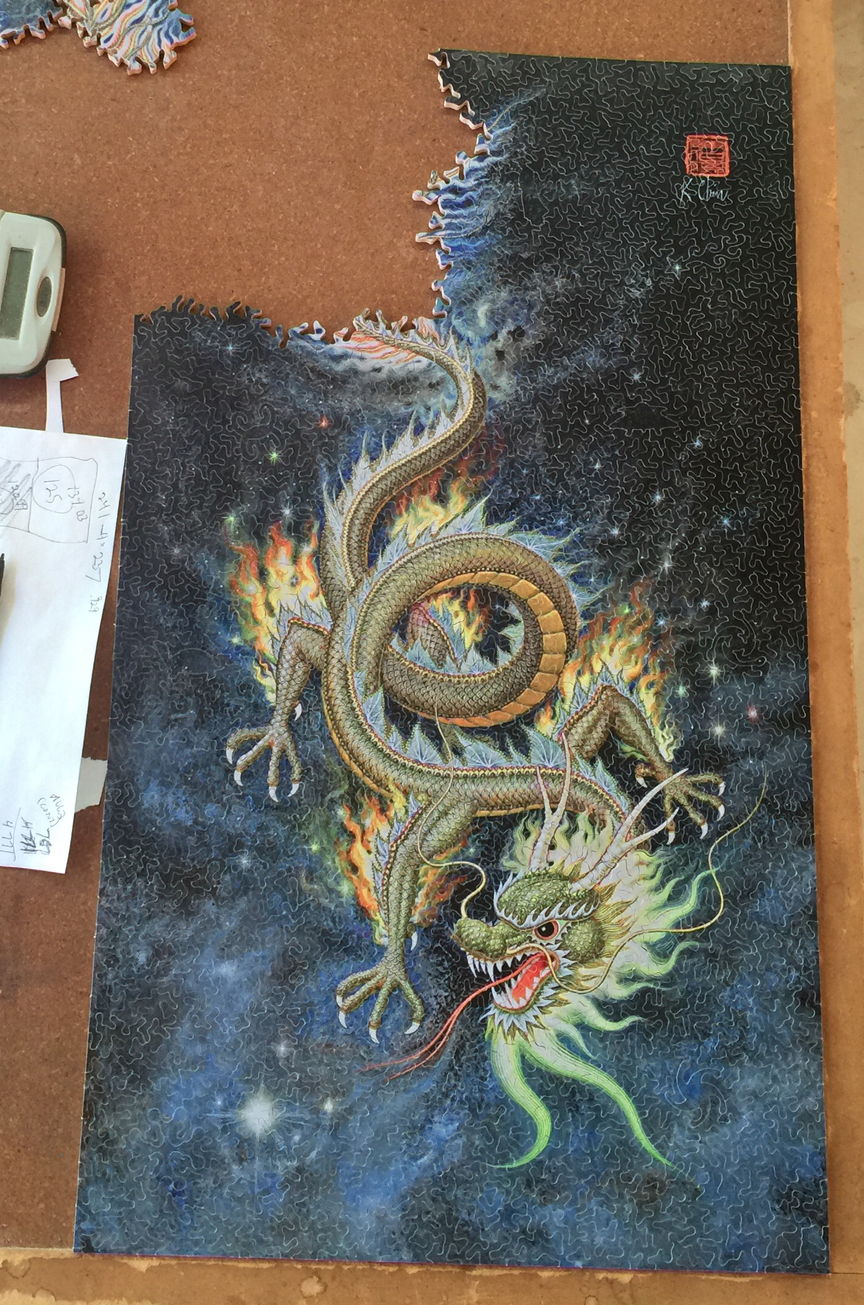
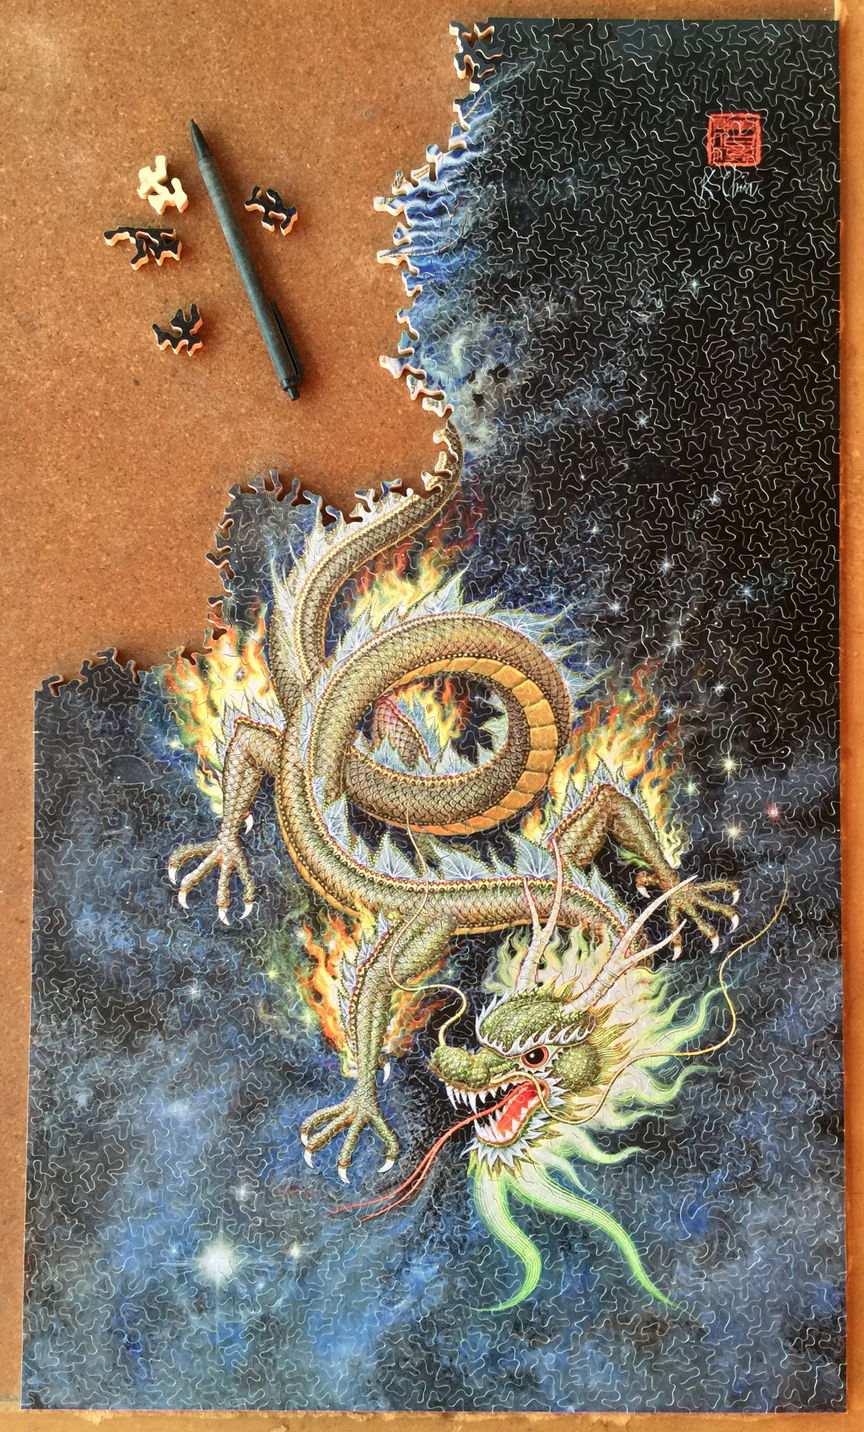
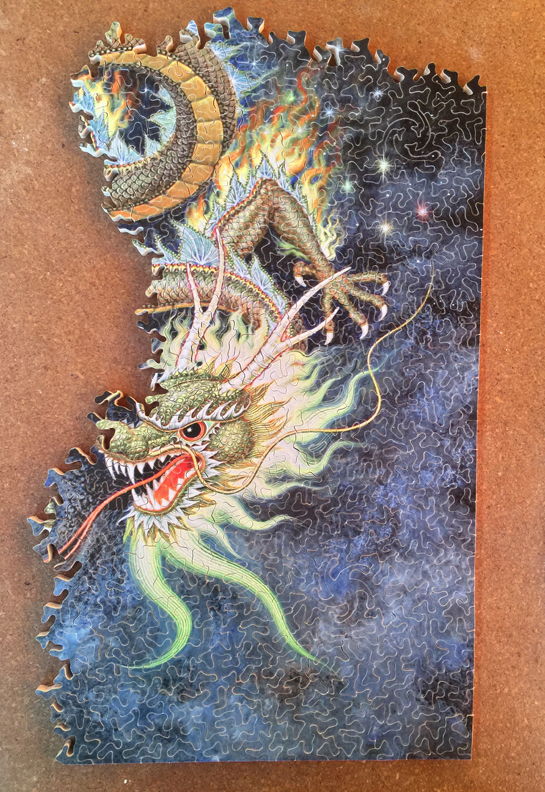
Thursday 9:29 PM - The Green Dragon auction is finally underway, started yesterday and will end on May 10 at 5:15 PM Pacific time. See Green Dragon.
January 6, 2025
The Green Dragon puzzle auction has been delayed. I will post here when the auction is launched. I'm expecting this to happen later this month.
December 16, 2024
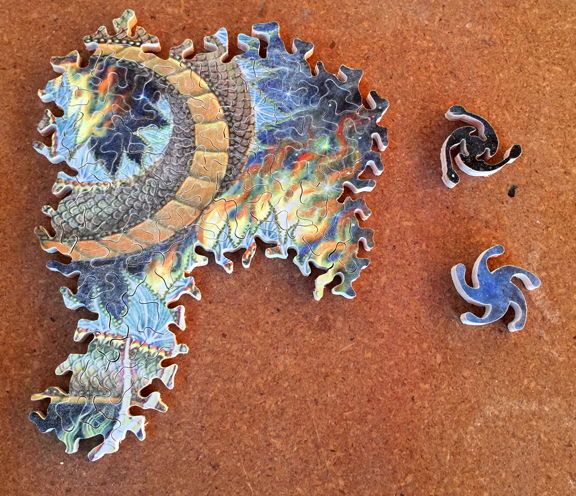
On or about January 7, 2025 I will be auctioning a truly impressive Green Dragon puzzle I completed on September 19, 2005. The dragon is completelly color line cut and a serious challenge to assemble. The surrounding area, cut in my Long Round cutting style is also a challenge. The long round area has a few Creative Style pieces sprinkled in to add a cool dimention to the look. Altough I made 11 Green Puzzles during the history of Custom Puzzle Craft, most were not color line cut. There are 465 pieces and the puzzle measures about 10 7/16 by 13 11/32". The puzzle was made for a customer who lost it. I made a second one for her in 2015 and then in 2024 the original one was found! I've been requested to put it on eBay and I'll be keeping the proceeds.

Puzzle #631, Green Dragon
October 9, 2023
Monday 1:18 PM - Today I was distressed to discovered that most of my larger K. Chin prints were severely damaged by water and mold.
August 21, 2023
Monday 10:26 AM - Wham! 3 1/2 years have passed. Two things: First I didn't realize in my last entry I said I have an operational shop. Was briefly true, but the equipment has been in storage again for at least 2 years. No plans to re-open Custom Puzzle Craft although I may still cut a puzzle again someday. The second thing is a couple days ago I found out that Mixed Media which includes the location of my old puzzle shop, and also a bunch of nearby buildings in the area are to be torn down and a bus depot built at the location. I visited Mixed Meda location on Saturday. The old shop was filled with heavy machinery. The big Coca-Cola plant across the street was gone, replaced by an even larger gleaming beverage distribution plant. A cactus which I planted 15-20 years ago was still there and reclaimed by me! Many memories.
January 1, 2020
Wednesday 3:47 PM - Happy New Year! Custom Puzzle Craft remains closed.
I now have an operational shop at "Sky Ranch", although I have yet to cut a new puzzle. I may do one for the Puzzle Parley this summer perhaps to give away, I will be going there.
After a bunch of years of inactivity, I received an order for a pair of earrings! As I no longer operate as a taxable entity on the Federal, State, County or City levels, I refunded the customer although I did ship a pair of earring I still had in stock! I also pulled the earrings page from this website to prevent further orders. Eventually I'll restore the page but without an ordering mechanism.
Alas, my "Stokes Patterns" remains on hold.
June 3, 2019
Monday 10:09 AM - I updated the K. Chin Mass Produced Lithos section to include two additional mushroom print images, prints I obtained a year or so ago but never got around to updating.
A bit more than a year after my previous attempt, I've renewed my effort on a new version of my pattern generator. Rather than calling it "New Expansions", I'm naming the program "Stokes Pattern Propagator", which will be focused on the creation, propagation and modification of Stokes Patterns.
January 1, 2019
Tuesday 9:42 PM - Happy New Year! Custom Puzzle Craft remains closed.
I purchased a new house we call "Sky Ranch". While not living there full time, in this past month I have moved all of my puzzle equipment from storage into the garage there. I plan to have an operational shop there "soon"! I do not plan to re-open Custom Puzzle Craft as a business, but I will very likely cut a few puzzles this year, not sure how I'll handle orders, if any.
I expected to get heavily involved with Expansions my pattern generator this past year, but other than a little attempt at learning a new programing environment, I did not make any progress. I expect to use "Sky Ranch" as my HQ for program development this year.
Although the earrings section remains open, no orders were received yet again.
I attended the 2018 Puzzle Parley in Rochester. I made a small demo puzzle at the Strong National Museum of Play and auctioned it off during a fund raiser raffle for the AGPI (Association for Games and Puzzles International). It sold for $125 It was a print someone had affixed to a small board maybe 5" x 7". I had some problems with the saw but it came out nice in Creative style, maybe 40 pieces? I do not have any pictures of it!!!!! It officially is puzzle # 932. If anyone knows who won the auction, please contact me at john.s.stokes3@gmail.com . I think the winner's name was Roz. It was good to meet some of my past customers and other puzzle makers and enthusiasts!
May 14, 2018
Monday 3:56 PM - Incredibly, finally, I have begun work on "New Expansions". So far very high level thinking and some spec writing. Coding is quite aways away as the programming environment plus computer technology hardware-software has completely changed since I last immersed myself in programming (1994)! At some point I plan to start an Expansions blog - either somewhere in the Expansions section or maybe a new website.
I may be reached at john.s.stokes3@gmail.com
January 1, 2018
Monday 1:40 PM - Happy New Year! Custom Puzzle Craft remains closed, equipment remains in storage.
Meanwhile I did not resume work on Color Expansions, but there are far less impediments and excuses not to resume this year.
On November 20, I gave a presentation at the Osher Life Long Learning Institute branch at the University of California San Diego campus, by invitation, titled "Patterns & Puzzles". While the turnout was light, the presentation was well received.
Earlier this year a documentary produced by Todd Mattox John Stokes: The Last Piece of the Puzzle: THE MOVIE! was released, it is good to have this record!
Also this past year I traveled to England and Ireland with my wife Katie, and in London met one of my favorite puzzle customers, and had a proper English tea!
Although the earrings section remains open, no orders were received.
I do plan to go to Rochester NY for the 2018 Puzzle Parley as an enthusiast, with no puzzles for sale.
January 1, 2017
Sunday 5:56 PM - Happy New Year! With Custom Puzzle Craft now closed, the normal year-end message has been discontinued. But, I do feel I can't completely ignore things, so here is an abbreviated review of 2016 and future plans.
Puzzle Work - Before closing I made two puzzles:
1) Tricky Circles - The last order! A spectacular plain wood puzzle cut in Creative style, 557 pieces
2) Golden Dragon #2 - Long Round with few "dragon set" figurals, total 1009 pieces. This puzzle was auctioned to coincide with the 2016 Puzzle Parley, and won "Best in Show"!
Website - The puzzle portion of this website was greatly reduced, although the Custom Puzzle Log and the Gallery Puzzle Log portion of the website were given more prominence as part of the legacy record. The Home page was reworked to display other areas of interest in addition to the main Custom Puzzle Craft link.
Puzzle Plans - I won't be reopening in 2017 for any puzzles. My equipment remains in storage.
Metal Work - No new work here, although the earrings section remains open.
Mixed Media - I closed my shop and left Mixed Media during 2016.
Pattern Generator - I do plan to attempt to begin new programming of Color Expansions this year!
September 2, 2016
Friday 8:23 PM - I need to add that for the last week and a half I've been doing a major clean-up of this website, first adding links for the Custom Puzzle Log and the Gallery Puzzle Log throughout the website, these logs were formerly someone obscurely available. Currently I continue to work on each of the individual puzzle pages, standardizing the presentation, particularly the specification sections and adding links to cutting styles where missing. Also some internal HTML coding issues are being cleaned up. It has been a pleasure to revisit so many of my puzzles in digital form! As of August 31, 2016 I turned in my keys to Mixed Media, I'm no longer a member there. Yesterday, September 1, 2016, I informed the California Board of Equalization that I am no longer in business and surrendered my reseller's status, and yesterday I also terminated my business tax certificate with the City of San Diego.
August 22, 2016
Monday 12:15 PM - I'm in the process of putting this website into dormant mode for historical purposes. This is the last entry here. At this time I am continuing the Environmental / Weather section and someday may resume work on some of the other sections.
August 18, 2016
Thursday 4:11 PM - Puzzle #931, Golden Dragon #2, the last puzzle I made at Mixed Media, home of my puzzle shop for over 16 years, has shipped.
What next? I wind down Custom Puzzle Craft's accounting, and go deeper into puzzle shutdown. I hope someday to establish a shop at home, and in some very limited capacity, make puzzles again. 2018 at the earliest.
Thank you everybody for your great support over the years!
August 17, 2016
Wednesday 6:34 PM - The Puzzle Parley was good with over 100 people there including, I think, 31 puzzle cutters.
Golden Dragon #2 sold, I thought to Shay Carmichael who was at the Parley, but in the last seconds was sniped away! I'm happy to say, Golden Dragon #2, won "best in show"!

Additional Puzzle Parley pictures may be seen on the Puzzle Parley Facebook page. I uploaded the trailer there too. Can also be seen on Youtube.
August 10, 2016
Wednesday 11:59 AM - A moment of silence as Custom Puzzle Craft at Mixed Media is no more.
************************************************************


August 9, 2016
Tuesday 5:49 PM - Uploaded yesterday's missing picture. Today, one more use of the table saw, cutting the 4x4 feet remaining Appleply boards in half for easier transport. Moved a lot more out today, I expect to complete the move-out tomorrow, except some Russian Birch I plan to sell on Craig's List after I return from the Puzzle Parley.
Meanwhile the Auction has been quiet these past couple days.

Shop as of August 9, 2016
Table saw, air filter, bunch of wood, some tables and various power tools, gone
August 8, 2016
Monday 5:15 PM - My last use of the table saw today at my shop; I cut two 16" x 14" boards for backing halves of Golden Dragon #2 for shrink wrapping, as I'll be transporting the puzzle assembled to the 2016 Puzzle Parley.

Shop as of August 8, 2016
All three scroll saws now in storage (sniff)
August 7, 2016
Sunday 9:20 PM - Official piece count for puzzle #931, Golden Dragon #2: 1009 pieces.
Sunday 4:42 PM - The Auction for puzzle #931 is off to a super start, thank you all so much for your bids.
This morning with had a garage sale / art show at Mixed Media. A few items were sold, I sold all of my spray paints in one batch plus a few other items, like glue and wood finishes. I'll be keeping all of my puzzle cutting equipment and some wood.

Scroll saws on the floor, alas.
Hegner 18" on left, Hegner 22" on right
August 6, 2016
Saturday 1:45 PM - Auction for puzzle #931, Golden Dragon #2, launched!
August 5, 2016
Friday - 7:05 PM - Puzzle #931, Golden Dragon #2, is complete! Went down to the wire as I need to launch the auction tomorrow so it will end during puzzle sales at the Puzzle Parley on August 13. The picture here is not the official picture, I'll do that tomorrow morning, the one here was taken in sunlight to accentuate the cut. I'm guessing the puzzle has about 1010 pieces, I'll do the counting before auction launch tomorrow.
Cutting went really well. No chip outs on the back; the only piece affected by a void has been repaired.
This already is an end of a long era. I'll get deeper into dismantling my puzzle shop and begin moving things out to storage tomorrow.
Puzzle #931 - Golden Dragon #2
This picture taken in sunlight
August 4, 2016
Thursday - 4:02 PM - Yesterday in several hours of cutting I brought up the piece count to about 813. Today less cutting, the count is up to about 891. I expect to complete the puzzle tomorrow and launch the auction on Saturday, timed to end during the puzzle sales at the 2016 Puzzle Parley in Salem MA. I did hit a void yesterday and that will be repaired tomorrow.
.
Puzzle #931, Golden Dragon #2 as of August 4, 2016
Puzzle #931, Golden Dragon #2 as of August 3, 2016
August 2, 2016
Tuesday 10:11 PM - This afternoon I cut about 216 pieces, bringing the total up to about 629. Cutting continues to go well. I expect to get more cutting in tomorrow afternoon.

Puzzle #931, Golden Dragon #2 as of August 2, 2016
Tuesday 8:44 AM - Did not get to the shop yesterday. I plan to spend most of this afternoon at the shop and make good progress.
The Puzzle Parley's open table sales of puzzles at the Hawthorn Hotel in Salem, MA starts at 3:30 PM and continues to 4:45 PM on Saturday August 13, 2016. I plan to launch the auction for Golden Dragon #2 at 1:30 PM Pacific Time (4:30 PM ET) on Saturday August 6, with the one week auction ending at 4:30 PM on August 13 towards the end of the open table sales. I will be at the Puzzle Parley with a laptop monitoring the auction, plus I'll have Golden Dragon #2 there on display. I won't have any other puzzles for sale although I may bring a few sets of earrings if I have time to polish and prepare them.
July 31, 2016
Sunday 10:46 PM - Got in a few hours of cutting today, subdividing the second quarter section then some detail cutting. Up to about 413 pieces, cutting continues to go well.

Puzzle #931, Golden Dragon #2 as of July 31, 2016
July 30, 2016
Saturday 6:10 PM - Good cutting session this afternoon, with the piece count up to around 275. The paper is cutting well, no problems! Meanwhile I saw a first draft of a trailer, Frank, the videographer put together, pretty cool! Hopefully we'll have something in time for the Puzzle Parley.
Puzzle #931, Golden Dragon #2 as of July 30, 2016
July 29, 2016
Friday 3:10 PM - Cutting puzzle #931, Golden Dragon #2 is underway and going well. With video rolling, I did the initial cuts (into quarters), then the edges and then subdivided one of the quarters to do a figural for the documentary. Later I began detail cutting, cutting a total of 49 pieces. I was at Mixed Media for about 4 1/2 hours. Tomorrow I hope to get some more cutting done.
Puzzle #931, Golden Dragon #2 as of July 29, 2016
July 28, 2016
Thursday 12:56 PM - The mount for #931, Golden Dragon #2, looks great. I expect to start cutting tomorrow.
July 27, 2016
Wednesday 1:31 PM - After some further tweaking of the image of Golden Dragon #2 for puzzle #931, I dropped off the digital file for printing last Monday. Yesterday morning I picked it up, looks great! It was printed on a Lightjet printer, with really excellent results. Later in the day I prepared a board and this morning with camera rolling, mounted it. First time, I'm pretty sure, I mounted a print at my shop instead of home. Later today I'll print the figural template set for the puzzle and tomorrow I'll check and see how the mount came out. I expect to start cutting the puzzle on Friday.
Meanwhile my 16 1/2 year run at Mixed Media is drawing to a close, as I'll be moving out after the Puzzle Parley. I've already begun the culling process of old artifact and mementos, keeping some, taking pictures of others and disposing of them, mostly from the "wall of horrors".
Wednesday 1:04 PM - On July 24, the owner of puzzle #931, Tricky Circles completed the puzzle after about 19 hours of assembly. Pretty fast!
Puzzle #930 - Tricky Circles - portion as of June 29, 2016
Puzzle #930 - Tricky Circles, just prior to sanding
Puzzle #930 - Tricky Circles - In the sun
July 23, 2016
Saturday 6:16 PM - Progress picture from the owner of Tricky Circles after 5.5 hours of assembly:
Tricky Circles is tricky!
Which side is the front? Only way to tell is knowing that my signature is on the back
Meanwhile I have taken several photos of the K. Chin painting I named Golden Dragon #2. I will be dropping it off for printing on Monday. The puzzle will be cut in straight Long Round without embedded Creative style pieces. The puzzle will be traditionally cut with straight edges and I will aim for the puzzle to have just over 1000 pieces with a figural set typical of my previous dragon puzzles. The puzzle will be about 25" high by 14 1/2" wide.
July 18, 2016
Monday 9:24 PM - Puzzle #930, Tricky Circles shipped.
Soon I'll take photographs of my K. Chin Golden Dragon #2 painting and have a print made from the best photo. I need to have the puzzle finished in time to launch an auction which will end during the time puzzle sales are being conducted at the 2016 Puzzle Parley in Salem MA.
July 16, 2016
Saturday 6:22 PM - Puzzle #930, Tricky Circles final piece count: 574 pieces.
Saturday 5:22 PM - I just discovered last Wednesday's entry did not update, sigh. Should show up now. Meanwhile today I was interviewed giving background of my childhood fascination with puzzles, and a general history of Custom Puzzle Craft. I will start taking apart the Tricky Circles puzzle and still expect to ship it on Monday.
July 13, 2016
Wednesday 9:32 AM - I completed the cutting of puzzle #930, Tricky Circles on Monday, with video crew present. Also documented was some sanding and vacuuming and an application of tung oil. The puzzle looks great. Yesterday I applied a second coating of tung oil to both side, and this morning, moved the puzzle to my home. After taking pictures, I will take the puzzle apart, inspect, count pieces, box and ship. This process may be delayed if the video crew wants to document any of this.
This puzzle is historic for several reasons:
- Last custom puzzle cut at my studio at Mixed Media. I joined Mixed Media in December 1999!
- By far the most irregular shaped puzzle I've ever made
- Puzzle cutting video'd for a short film possibly to be used for getting funding for a feature length documentary about the word of jigsaw puzzles.
July 10, 2016
Sunday 8:19 PM - In another 2 1/2 hour cutting stint yesterday I cut another 52-54 pieces of puzzle #930, Tricky Circles, and have just 7 or so pieces to go! I didn't cut the rest as the final pieces will be cut tomorrow, Monday, with video crew present. Tricky Circles is an excellent work and the reaction from those who have seen the work has been super positive. I will also do sanding and apply the first layer of tung oil to one side.
Today at Mixed Media we had a massive cleanup, with a second cleanup to take place in two weeks.
July 8, 2016
Friday 9:41 PM - Did about 2 1/2 hours of cutting today, cutting about 52 pieces of puzzle #930, Tricky Circles. Have about 512 pieces done with about 60 to go. I'll cut all but a few pieces this weekend and then cut the final pieces on Monday with video crew present. Cutting continues to go extremely well. I'll also do sanding, inspection, cleanup and counting early next week with a goal of shipping the puzzle around midweek. I will then immediately focus on Golden Dragon #2.
July 7, 2016
Thursday 6:15 PM - Yesterday, again just a little cutting (about 20 pieces) of puzzle #930, Tricky Circles, and today in about 2 1/2 hours of cutting cut about 54 more. The projected piece count remains in the 570-575 range, with about 460 done. Cutting continues to be excellent, as good as any Creative style puzzle I've cut! Eventually, after the puzzle is shipped and assembled, I'll have plenty of pictures here and will create a dedicated web page for it.
July 5, 2016
Tuesday 8:19 AM - Just a little cutting on Sunday (about 30 pieces) and nothing yesterday. Due to an illness in the family the New Orleans trip has been canceled. I expect to get some work in on the puzzle this week.
July 2, 2016
Saturday 7:15 PM - Yesterday and today I was at the shop for about 1.5 hours each day and cut 35 and 36 more pieces respectively in puzzle #930, Tricky Circles. Cutting is still going very well. The estimated piece count is around 356 and the estimated total the puzzle will have is 571. I won't complete the puzzle prior to leaving for New Orleans this coming week. I'm now expecting to ship the puzzle around mid July. I will then immediately being work on Golden Dragon #2.
June 30, 2016
Thursday 10:56 PM - Was at the shop for about five hours today and cut another 100 or so pieces, cutting going extremely well, some of my best Creative style cutting ever. Haven't lost my touch at all. Now about half done the puzzle. Will have pictures later..........
June 29, 2016
Wednesday 6:21 PM - Yesterday I cut about 65 pieces, and today about 100. I've update the projected piece count back to around ~575 as the pieces are coming in a bit smaller than expected. Puzzle is going very well! Film crew was back in today for some detail shots. They are done now with this puzzle except to come back when I get to the end of the puzzle plus for some post cutting work. While I still hope to get the puzzle done and shipped before leaving for New Orleans, this is looking doubtful. Probably more like around July 15. After that I'll immediately begin work on my last puzzle as an official company, Golden Dragon #2.
June 27, 2016
Monday 4:29 PM - Today I completed the interior and exterior edge work for puzzle #930, Tricky Circles. The design is quite elaborate and impressive looking. After I finished the cutting I allocated piece counts to the 23 sections. I've updated the estimated pieces from 500-575 to around 510. I had hoped to complete this puzzle by the end of June, but the way things are going, looks like sometime in the first week of July. I'm leaving for New Orleans on July 6, my goal is to get the puzzle done and shipped before I leave. Detail cutting starts tomorrow.
Due to time constrains with the rapidly approaching Puzzle Parley and call of duty around the house, and also due to the non-monochromatic image of puzzle #931, Golden Dragon #2 (was named Golden Dragon #3, but I'm now using that name for the one I've never seen), I'm changing the cutting style from Creative to Long Round with Creative. I've upped the projected piece count from 500 to 700, this number is still very preliminary as I haven't settled on the size of the puzzle!
Monday 12:15 PM - Yesterday I did the exterior and interior edge cutting of 4 of the 6 sections I created yesterday. Took about 4 hours. Video crew was present for about 1/2 hour shooting some footage of my work while doing the first of the 6 sections. They are now done with this puzzle, except they will be back when I cut the final pieces and do the sanding, tung oil and inspection. The puzzle already looks very very cool! Leaving for the shop shortly to do the final two sections and some prep work for the next phase.
June 26, 2016
Sunday 10:33 AM - Did some cutting yesterday, subdividing 3 sections into 6. Will do quite a bit more cutting today with video crew present.
A subdivision cut for Puzzle #930 Tricky Circles
June 25, 2016
Saturday 9:19 AM - Yesterday I started cutting puzzle #930, Tricky Circles, my first official puzzle cutting since April 4, 2015! The fairly harrowing initial cut went well. I then subdivided the larger of the two sections, so I now have three large sections to work with.
Because the image of the puzzle is to be a surprise for the customer, I won't be posting pictures of the full image until after the customer has assembled the puzzle.
Todd Mattox (the husband of my sister in-law), and Frank Maggi are digitally filming parts of my making this puzzle for a possible documentary about the world of wooden jigsaw puzzles. They were at the shop yesterday with quite a bit of equipment including three video cameras.
I plan to subdivide the sections into smaller chunks today. Tomorrow morning, cutting resumes with the film crew present!
Setting things up for the film shoot for puzzle 930 Tricky Circles
Frank Maggi shown here. I lifted this panoramic picture taken by Todd Mattox from Todd's FB page, cropped it considerably and reduced its size for this journal
June 22, 2016
Wednesday 10:11 PM - In about 3 hours of work I designed the layout for the Tricky Circles puzzle, puzzle #930. I did some initial design work for this puzzle on December 4, 2014 and had not looked at that design work for at least a year! I used that work as the basis of the current design, the current design being far more complex! I no longer have my 24" wide printer, so printing a guide for some of the curved cuts is vastly more complex, 25 pages of overlapping prints on 8.5x11 paper with grid guidance to help with the alignment.
Puzzle work is schedule to start Friday morning with the presence of a videographer and a script writer! As the initial cut of this large puzzle is going to be one of the most difficult ever, I plan to do some practice work tomorrow.
I've narrowed the projected range of pieces from 500-650 to 500-575. Also I changed the status of the board as being not prepared, the previous board is a bit too small.
June 11, 2016
Saturday 12:14 PM - A couple days ago I completed the major cleanup of my shop. Even made a two piece "puzzle" just to see how much I remembered. Basically, it was like I never took a break!

A one cut exercise - June 8, 2016

Custom Puzzle Craft Intergalactic Manufacturing Center as of June 6, 2016
A bit more cleanup followed the next day
The fans were moved to the left side of the main saw (saw is under a blanket) and an air filter moved to the right much closer to the saw than before
June 1, 2016
Wednesday 7:31 PM - Two months have passed since the last entry, time is flying! Finally I'm getting serious about getting to The Puzzle Queue as the Puzzle Parley is approaching. I've been to my shop these past two days, doing some cleaning and reorganizing plus removing huge piles of things stored from my old apartment when I moved. There is still a lot do! I checked the scroll saw, still works fine.
© John S. Stokes III - Puzzle Crafter & Webmaster
|